October 26, 2010

No-fuss Birthday Parties- Zoo Safari

My little boy turned six this year, and also started kindergarten. Which means the arrival of whole-class birthday parties! You know, the dreaded, "If you invite one, you invite them all" rule. Don't get me wrong, we don't know any of his classmates well enough to even know which ones we would want to exclude. It's just that the thought of 20 five and six year-olds running through my house gives me nightmares, as does forking over $300 to pay for them to run around at the pizza arcade, bowling alley, or bouncy house place. My shy little guy was a bit overwhelmed at the thought as well.
I asked him what he really wanted to do for his birthday and he responded he wanted to go to the zoo and see the tigers. Done!
I called or emailed the mothers of his closest friends- he was limited to a list of 4 because that is how many I could fit in my van for the 60 minute drive to the zoo. There was no arguing or negotiating or scrambling at the last minute to accommodate tag along siblings. You simply cannot change the number of seat belts in the car!
The day before the party I went to the party goods store and picked up a stack of plastic safari hats, binoculars, tiny toy compasses, and big bag of small plastic jungle animals. There is no outside food or drink allowed in the zoo, so I didn't have to worry about cake or candles, and no one seemed to mind at all.
On the day of our party, I picked up our band of safari hunters and my son passed out the hats, binoculars, and compasses. I carried a bag with water bottles, sunscreen, and a small first aid kit. We have a membership at the zoo, so we used our passes to get in free.
Each explorer was armed with a map, and I let them take the lead by having each boy choose one "must-see" animal. We then located each on the map and marked a trail to follow. I tried to arrange our route so that we would end up at the restaurant about lunch time, and end near the ice cream shop and exit. Their job was to get us from one animal to another, stopping to see whatever we passed in between. Mid-morning we stopped for an icee break, hit the cafe at lunch time to sing happy birthday over hot dogs and fries, and ended with ice cream cones on the way to the parking lot.
I drove a car load of very tired boys back home in time for naps, having spent less than an hour on prep work and under $50 for a great day that included food, entertainment, souvenirs, and a memorable experience for everyone.  

Memo Board

Another addition to my daughter's room- a memo board. Not just a boring brown bulletin board, but a ribbon-laced rainbow-colored bulletin board to coordinate with her fairy garden theme.
This project was super-easy and fast. The hardest part was mastering the staple gun!
Cut a square of fabric and batting just larger than your board, flip it to the back and staple! Start with the center top and bottom, then the center sides. Then do the corners by folding the fabric as you would gift wrap and stapling. Criss-cross the front with ribbon, stapling the ends to the back and weaving the ribbon as you go. I suppose if you really wanted to, you could cover the cardboard backing with some pretty paper. This is going straight on the wall, so I didn't worry about it. If this board was larger and you wanted to make sure the ribbon stayed in place, you could anchor the ribbon to the board at each intersection with a button or a brad. This one was small, about a foot square, so it wasn't needed.


Ta-da! Boring bulletin board into fairy garden memo board.

October 18, 2010

Quilt for my boy.


So when my oldest was 2years old I made him a quilt, he is now 8 and his feet stick out the bottom, so it was time for a new one. I'm not a fancy professional but he loves it and that is what counts! Plus his favorite color is red!

Fishing Picture Frame

My Boys love fishing so I decided to make them a frame for their fish photos.

So I took an unfinished frame from our local craft store and painted it blue.

modge podged alphabet letters


Added vinyl lettering and rubbed a little ink to age it a bit, make it look a little dirty.


used a spray sealer

added their photos, and hot glued a plant hanger frog to the top.
There you go, I put this on my boys dresser and can switch out the pics. as they grow!

October 6, 2010

A Quiet Book for Busy Fingers

My latest late night sewing project- a cloth activity book for my toddler.

I wanted something soft, portable, interesting, silent, durable, and inexpensive for her to play with while we were out and about and waiting. Places like office waiting rooms, church, club meetings, car rides, older sibling lessons, etc.  Something that would be engaging, age appropriate, and educational. I saw several for sale in specialty stores or etsy shops and really wasn't impressed. I thought most of them were over-priced, too small, or too simple and didn't include the activities that I wanted. So I decided to make my own. I looked at all the links on this site, took a few notes on the pages I liked, and made a plan. I had about 25 pages worth of really great ideas, and about 15 pages worth of supplies and attention span for the project. So I narrowed it down with a few requirements: it had to be simple, made with materials I already had in my stash, and adaptable for several skill levels (I know big brother is going to swipe it, and I want it to be just as fun next year when she can do more).

I am not a perfectionist or one who obsesses over details. I just made things up as I went. I sketched things freehand, so have no patterns for you to print out. I like to cheat, so if I could glue it with liquid stitch, I did. If I could stick it together with fusible web instead of sewing and turning, I did. If I could use the print on the fabric or draw it in with a sharpie instead of sewing on details, I did. I used fabric scraps from my stockpile and looked specifically for pieces with interesting and varied colors, textures, and patterns. So that is my little disclaimer.

Now, some pictures for you:

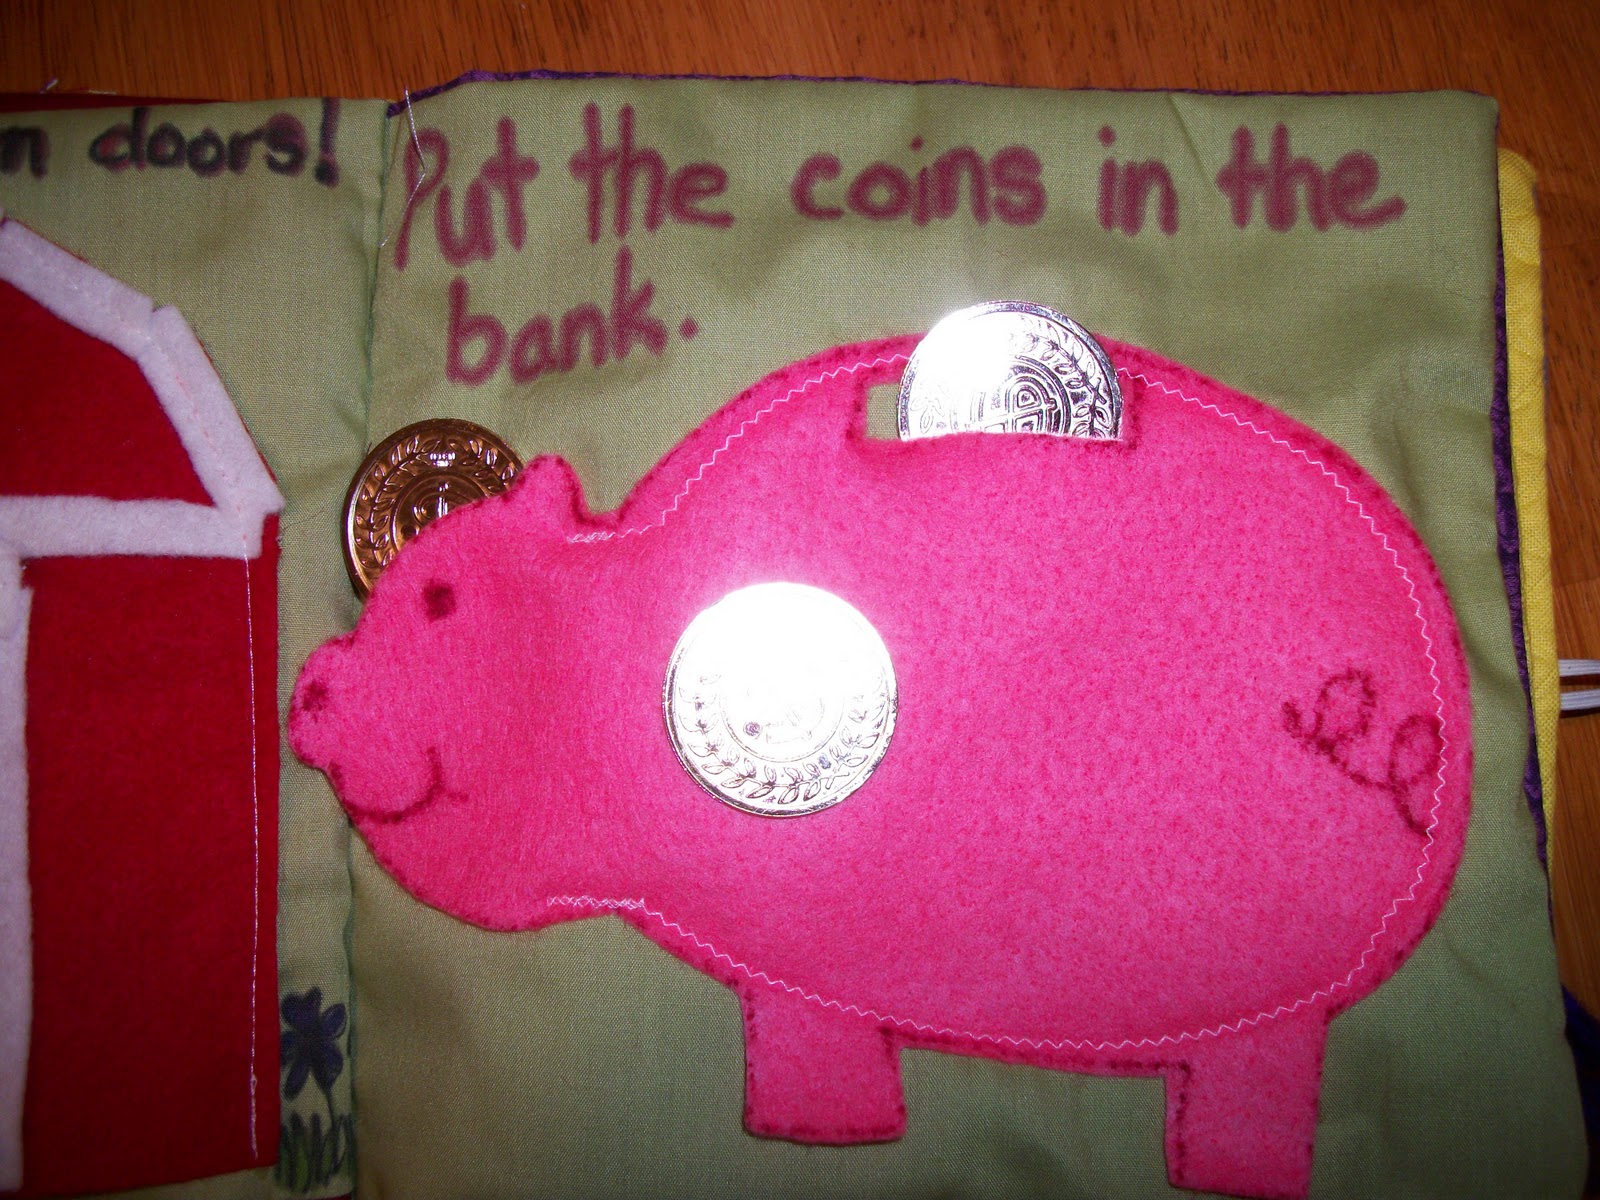
 The front cover- I used an old pair of jeans for the cover so it would be durable and thicker than the inside pages. I fused on my hand print, which I had traced onto corduroy, and hand lettered the title. A big colorful button and an elastic loop provide a simple closure.

 Snap on cupcakes and ice cream scoops. The cone and cupcake wrapper are fused on, I hand-sewed on the snaps, and used fusible web to make the scoops thicker and double-sided. I just picked out prints with interesting color combinations. My daughter is really into yellow, so I tucked some in wherever I could.

 Apple tree with birds and apples. The apples and tree are made from felt, so I only had to put velcro on the apples and they stick to the tree anywhere. The birds are just cut out and glued on. The basket has a pocket to keep the apples in.

Button on flowers. I took this pic before my glue dried- oops. More little birdies glued in place, along with the stems and grass. I sewed on the buttons, fused some fabric together and cut out flower shapes, then cut a button hole in the center of each flower. Easy but cute.

 Write a letter. or scribble for a few minutes, whatever! The pocket holds a small notebook and a pencil or crayons. The mailbox flap opens so you can stick a note inside to mail it.

 Fishing pond. My daughter's current favorite. I cut out some fish from an ocean print and fused it to a solid color backing. I put a paperclip in between the layers first, so each fish will stick magically to the magnet on the end of the pole. A piece of old shower curtain sewed on top of the pond makes a fun pocket. The pole is just a kitchen skewer, a length of yarn, and two sticky-backed magnets sandwiched around the yarn end. Right now, she just likes to pull all the fish out by hand.

 A bead abacus. Beads on yarn, sewn behind two fabric scrap poles. Simple but surprisingly engaging.

 Alphabet page. The pocket at the bottom holds velcro backed letters that stick to the velcro lines at the top. I found a package of sticky-backed felt letters, stuck them to the flat side of a strip of velcro, and sewed two lines down the center of the strip, catching as much of the letters as I could. I figured between the glue and the stitching they would stay on ok. I started by making sure I had all the letters required to spell her name, then added her sibling's, and threw in a few extras just in case. I figure I have a few years before she can actually start spelling words.

 Old McDonald's farm. Another favorite. Simple barn shape cut from red felt, with some white details.

 Open the barn door to reveal a felt pocket holding some animal finger puppets. I tried to keep them simple with just enough detail to tell what animal it was. Glue and sharpies and one zigzag seam to reinforce the glue on the edges.

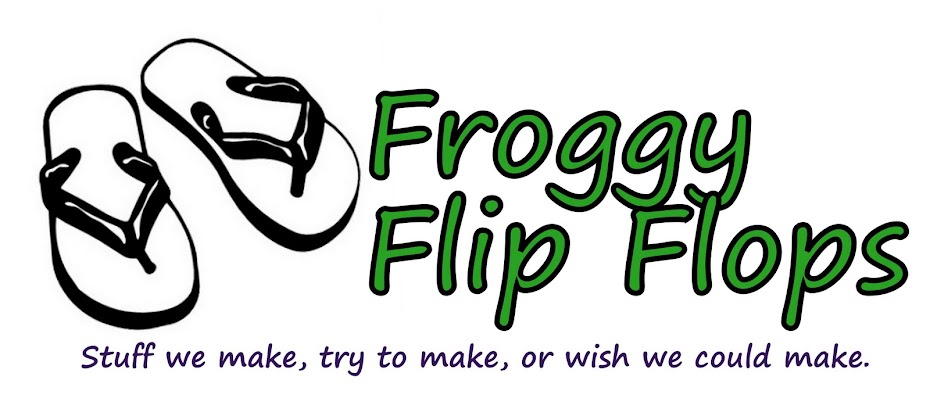
 A big felt piggy bank with a slot cut in the top. I didn't sew around the head so the coins can be pulled back out by reaching through the neck opening. A stack of plastic coins (too big to swallow!) from the party favor store are great for counting.

 A dolly with yarn hair for braiding, tying, putting clips in, or just running tiny fingers through. The dress is a pocket to hold hair clips and ribbon scraps.

 A shoe to tie. I traced my daughter's foot on the green fabric, sewed it down, then added the white felt details. I added a yard shoelace.

The last page. A vinyl pocket (that shower curtain again) under some felt mittens I made by tracing my hand with fingers together. the mittens pull back to reveal a family picture. Babies and toddlers love peek-a-boo and looking at pictures of people they know!

 The last page just tells other families who to return the book to when my kids leave it under the bench at church. After all the late nights I gave up tv to sew, I figured it was worth trying to get it back.

Back cover. The pocket of the jeans and a fused on tiny hand print. A snack baggie full of snacks fits just right in the pocket, as well as cast off hair clips, hot wheels cars, or stray crayons.

So there you have it. I had to scrap a few pages because I knew if my ambitions were too high, I would just give up. But If I ever decide to add to it, I love the dinosaur eggs with little plastic dinos in them, the Noah's ark with jungle animals in a zipper pocket, the cupcake oven, and so many more! This is one project that will go on forever if I let it.

One quiet book, made by a very beginning sewer, for free! If I can do it, you can do it!

Linking to Made by You on Skip to my Lou

October 5, 2010

Flutter Paper Mobile

Have you seen this picture?
An easy to follow tutorial for the project can be found here.

I thought they looked gorgeous, and decided to make my own. The originals were made with rainbow colored vellum and weighted with tiny fishing line sinkers.

I had to make some modifications to make these work in my house. First, vellum is expensive and I didn't want to spend a dollar a sheet at the craft store or buy a case of 100 sheets. Also, it will curl and warp when exposed to humidity for a long period of time and I live in the south. It didn't stand a chance! So I used card stock instead. It loses a little of the translucent light effect but the colors and fluttering and movement are still there! And I didn't have tiny little fishing line weights so I used these feather butterflies I picked up in the bargain bin at the craft store. It fit great with the theme of my daughter's room.


So after you get a stack of pretty paper and something to tie to the bottom, here's a three step tutorial for you:

1. Cut paper into strips. How small depends on how much work you want to do. I went with about 1.5"

2. Set the stitch length on your sewing machine to the longest you have then sew your strips together down the middle. Make sure you sew a few stitches between each piece so that they don't overlap. You want each piece to be able to turn independently. I used ten strips for each mobile. If you have a really high ceiling or are hanging them over a table and no one will be walking under them, you could make them longer. I wanted mine out of reach of little hands jumping on the bed, so I kept them short. Pull a length of thread out before you start and at the end of each set for hanging and to tie on your weight.

3. Tie on a weight. Go with something tiny and small like a fishing weight or a bead, or big and colorful like a butterfly, fabric flower, tiny car, or whatever works with the theme you are using in the room.

Now hang, turn on the ceiling fan, and admire! 

(OK, that was four, but an easy four!)

Hooded Towel

I love babies in hooded towels. I think they are adorable.

My older kids love them too, and are always reluctant to give theirs up, even when their little bums are showing out the bottom because they grow and the towels don't. I couldn't find any larger hooded towels in the stores for my two older kids, so I decided to make them myself.

This is a super easy project (anything I sew has to be) but if you need a detailed tutorial, there are dozens online. I just made it up as I went using my toddler's towel as a guide. I made two in about 15 minutes, and I am not a super-sewer!

What you need:
a large towel- I used a beach towel
a hand towel in a coordinating color. If you are making one for a small child, use only half the towel.
a sewing machine
optional- coordinating ribbon or appliques for embellishment

Here's how:

Lay out your towel then fold it in half. Mark center with a pin. Repeat with small towel.

Line up your pins and place your towels slightly overlapping. if you cut your small towel, put the raw edge facing up, away from the large towel. The hood seam will take care of this later. Pin in place.

Sew them together (see, easy). I used a zigzag stitch and made two seams- one along the top edge of the big towel, another along the bottom edge of the small towel. Sounds complicated, but look, really easy.

Next, fold the towel in half, right sides together. Sew the top edge of the small towel closed. This makes your hood.

Now, to prevent elf head, you need to trim the top point of the hood. Unless you like that look, then leave it! To get the flat top just sew a seam on a diagonal across the point of the hood.

If you are into simple, you are done! Just plop it on top of your favorite wet kid!

If you don't do simple, then you can fancy it up a bit. Sew coordinating ribbon along the edges of the towel or front edge of the hood. Add cute little applique pictures to the hood or back of the towel. Whatever will make you and your little one happy!